Encountering the “Android Studio Cannot Display Build Apk” error can be a frustrating roadblock in your Android development journey. This error typically occurs when Android Studio fails to generate a viewable APK file of your project, hindering your ability to test, debug, or distribute your app.
But don’t worry, this guide will walk you through common causes of this error and provide practical solutions to get your APK up and running smoothly.
Understanding the Error: “Android Studio cannot display build APK”
Before we delve into the solutions, it’s crucial to understand why this error appears. The “Android Studio cannot display build APK” message essentially indicates that the build process, which transforms your code and resources into a deployable APK, has hit a snag. This could be due to a variety of factors ranging from misconfigurations in your project settings to issues with your build tools or dependencies.
Common Causes and Solutions
Here are some of the most frequent culprits behind the “Android Studio cannot display build APK” error and how to address them:
1. Build Output Path Issues
Problem: Android Studio might be looking for the APK in the wrong directory.
Solution: Verify that the build output path is correctly set in your project settings.
- Go to
File > Project Structure > Modules - Select the module you are working on.
- Under the ‘Paths’ tab, ensure the ‘Compile Output Path’ is set to the desired directory.
 Setting the correct build output path in Android Studio
2. Build Variants and Product Flavors
Problem: If your project utilizes build variants or product flavors, the generated APK might be associated with a variant that’s not set as your default.
Solution: Select the correct build variant from the “Build Variants” window in Android Studio.
- Look for the “Build Variants” tab usually located on the bottom-left corner of the IDE.
- Select the desired build variant (e.g., debug, release) from the dropdown menu.
- Rebuild your project.
 Choosing the appropriate build variant for APK generation
3. Gradle Sync Problems
Problem: Synchronization issues between your project and Gradle files (which manage your project’s build process) can prevent the APK from being generated correctly.
Solution: Try a Gradle sync by clicking File > Sync Project with Gradle Files.
4. Cache Conflicts
Problem: Android Studio’s cache, while designed to speed up processes, can sometimes hold corrupted files that interfere with the build process.
Solution: Invalidate the cache and restart Android Studio.
- Go to
File > Invalidate Caches / Restart. - Select “Invalidate and Restart” when prompted.
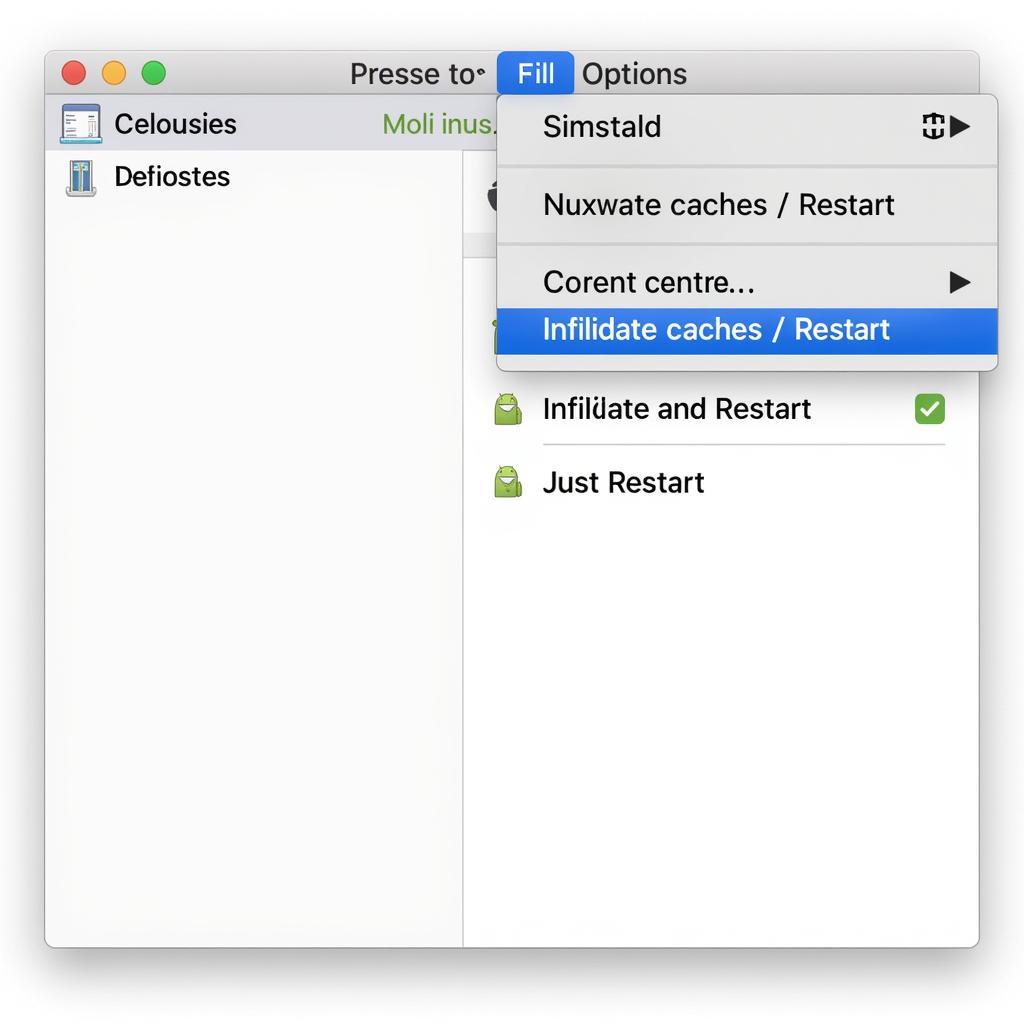 Invalidating cache and restarting Android Studio to resolve build errors
5. Outdated Build Tools or Dependencies
Problem: Using outdated versions of the Android SDK Build-Tools or having conflicting dependencies in your project can lead to build failures.
Solution: Update your build tools and dependencies to their latest stable versions.
- Navigate to
Tools > SDK Manager. - Check for updates in the “SDK Tools” tab and install any available updates for your build tools.
- Review your project’s
build.gradlefiles and ensure your dependencies are compatible and up-to-date.
Still Facing Issues? Contact Our Support
If you’ve tried all these solutions and still can’t display your build APK, our team at Game VN APK is here to help. Reach out to us at:
- Phone Number: 0977693168
- Email: [email protected]
- Address: 219 Đồng Đăng, Việt Hưng, Hạ Long, Quảng Ninh 200000, Việt Nam
Our 24/7 customer support team is ready to assist you!